
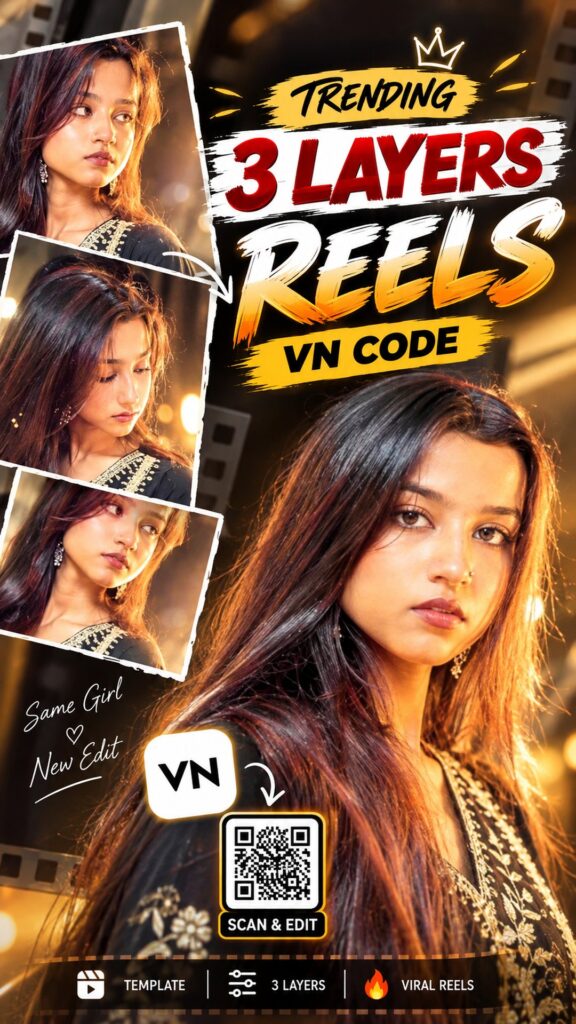
The 3 Layers edit stacks several photos and clips in the same frame instead of showing them one after another, which is why it reads as depth rather than a slideshow. The VN Code below carries the whole project — layers, transitions, beat timing and effects — so you scan it, drop in your own media and export. Full guide in English, Hindi and Gujarati.
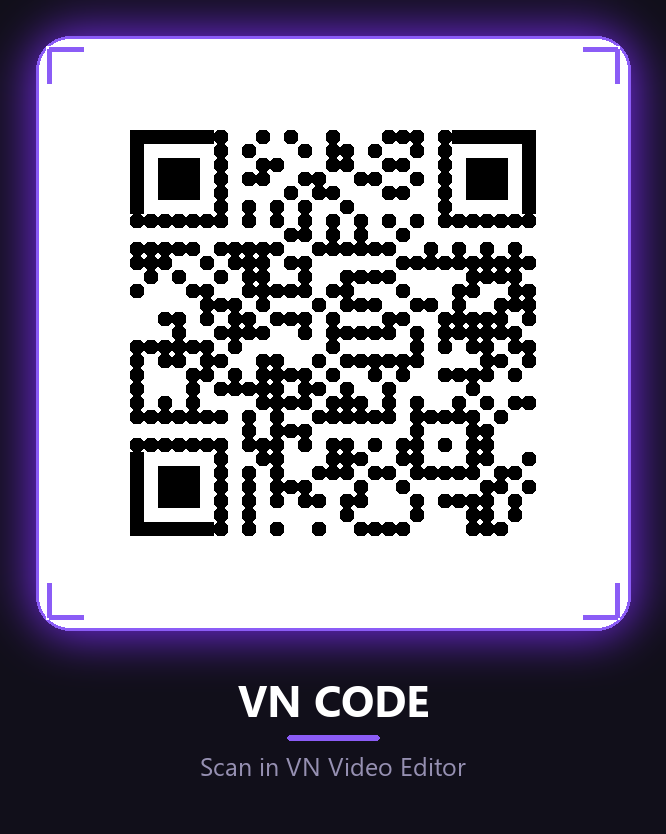
VN Code
Screenshot or save this code, then scan it inside the VN app.
Free · Available on the Play Store
Template details
| Template name | 3 Layers Reel Edit |
| App | VN Video Editor |
| Import method | VN Code (QR scan) |
| Media type | Photos or short video clips |
| Editing style | Multi-layer composition, beat-synced cuts, zoom movement |
| Best for | Instagram Reels, WhatsApp status, YouTube Shorts, Facebook Reels |
| Difficulty | Beginner — no editing skill needed |
English — Full Guide
What you actually get
A VN Code is a whole VN Video Editor project compressed into a scannable code. Scanning this one rebuilds the 3 Layers edit on your phone with every layer, transition, filter and cut already in position. The sample media is placeholder — you swap it for your own and the structure stays exactly as built.
The name describes the technique: instead of one photo filling the frame at a time, several sit on stacked layers that move independently. That is what gives the edit its sense of depth, and it is very tedious to build by hand.
Why this edit took off
A single-photo slideshow gives the eye one thing to follow. Three layers give it three, and when they change on the beat the reel feels faster than it actually is. That is why this style suits songs with a clear, hard rhythm — the cuts have something to land on.
Building that manually means keyframing each layer separately and matching every movement to the track. The code skips all of it, which is the entire appeal.
How to use this VN Code, step by step
Find this post on PromptPin
Open Google and search for PromptPin, visit promptpin.in and open this 3 Layers VN Code post. Bookmark it if you want to come back for the next trending code.
Save the VN Code
Screenshot the code above, or press and hold to save it to your gallery. VN reads it from your photos, so it needs to be saved before you open the app.
Open VN Video Editor
Launch the VN app. If you do not have it, install it first using the Open VN Video Editor button above.
Scan the code
Open the scanner inside VN and either point it at the code on another screen or import the screenshot you just saved. VN reads it and opens the template page.
Tap "Download" first
The first button you see is Download, not Use Template. Tap it and wait for the project to finish downloading — on a slow connection this takes a few seconds.
Now tap "Use Template"
Once the download completes, the same button changes to Use Template. Tap it and VN asks for the media that replaces the placeholder clips.
Choose your photos or video clips
Now choose the photos or video clips you want in your reel. Try to select clear, high-quality media — portrait photos and vertical clips usually work best for social media. The number of clips required varies from template to template, so just fill the layers the project asks for. Vary the poses and framing so each layer looks distinct.
Check each layer
Because layers overlap, an important detail near the edge of a photo can end up hidden behind another layer. Tap through them and reposition anything that gets covered or clipped by a zoom.
Preview the whole thing
Play it start to finish and watch the beat timing rather than the pictures. If a cut lands slightly off the music, that is the one thing worth nudging before you export.
Export and share
Export at the highest quality VN offers and the reel saves to your device. From there it goes straight to Instagram Reels, Facebook, YouTube Shorts or WhatsApp status.
Tips for a better reel
- Avoid busy photos. With three layers on screen, a cluttered image turns the frame into noise.
- Keep the subject away from the edges — overlapping layers cover the corners first.
- Mix a close-up with a wider shot so the layers read as separate rather than repeating.
- Similar lighting across your media keeps the stacked frames looking like one piece.
- Post while the song is still trending — timing matters as much as editing.
VN Code not working?
If the scanner does not pick up the code, the screenshot is usually the problem — crop it so the code fills the frame, and make sure the whole white border is included. A dim screen or a heavily compressed copy can also fail to scan. If the project imports but will not open, update VN to the latest version, since older builds cannot read newer project files.
Stay safe: only install VN Video Editor from the official Play Store listing. Never download modified VN APK files from unknown websites.
हिंदी — पूरी जानकारी
इसमें आपको क्या मिलता है
VN Code असल में पूरा VN Video Editor प्रोजेक्ट है, जो एक स्कैन होने वाले कोड में बंद कर दिया गया है। इसे स्कैन करते ही 3 Layers एडिट आपके फ़ोन में वैसा ही बन जाता है — हर लेयर, ट्रांज़िशन, फ़िल्टर और कट अपनी जगह पर। अंदर जो मीडिया दिखता है वह सिर्फ़ सैंपल है; आप अपनी फ़ोटो लगाते हैं और स्ट्रक्चर वैसा ही रहता है।
नाम से ही तरीक़ा साफ़ है: एक समय पर एक फ़ोटो दिखने की जगह कई फ़ोटो अलग-अलग लेयर पर रहती हैं और अपनी-अपनी चाल से चलती हैं। इसी से एडिट में गहराई आती है, और हाथ से यही बनाना सबसे थकाऊ काम है।
यह एडिट क्यों चल पड़ा
साधारण स्लाइडशो में आँख को एक ही चीज़ देखने को मिलती है। तीन लेयर में तीन मिलती हैं, और जब वे बीट पर बदलती हैं तो रील असल रफ़्तार से भी तेज़ लगती है। इसलिए यह स्टाइल साफ़ और तेज़ बीट वाले गानों पर सबसे अच्छा चलता है।
यही चीज़ हाथ से बनाने में हर लेयर की अलग कीफ़्रेमिंग और हर मूवमेंट को गाने से मिलाना पड़ता है। कोड यह सारा काम बचा देता है — पूरी लोकप्रियता की वजह यही है।
VN Code इस्तेमाल करने का तरीका
यह पोस्ट PromptPin पर खोलें
Google खोलकर PromptPin सर्च करें, promptpin.in पर जाएँ और यह 3 Layers VN Code पोस्ट खोलें। अगली ट्रेंडिंग कोड के लिए इसे बुकमार्क कर लें।
VN Code सेव करें
ऊपर दिए कोड का स्क्रीनशॉट लें, या दबाकर गैलरी में सेव करें। VN इसे आपकी फ़ोटो में से पढ़ता है, इसलिए ऐप खोलने से पहले सेव होना ज़रूरी है।
VN Video Editor खोलें
VN ऐप खोलें। अगर इंस्टॉल नहीं है तो ऊपर दिए Open VN Video Editor बटन से पहले इंस्टॉल कर लें।
कोड स्कैन करें
VN के अंदर स्कैनर खोलें और या तो कोड को दूसरी स्क्रीन पर दिखाकर स्कैन करें, या सेव किया स्क्रीनशॉट इम्पोर्ट करें। VN उसे पढ़कर टेम्पलेट पेज खोल देगा।
पहले "Download" दबाएँ
सबसे पहले Download बटन दिखेगा, Use Template नहीं। उसे दबाएँ और प्रोजेक्ट डाउनलोड पूरा होने का इंतज़ार करें — धीमे इंटरनेट पर इसमें कुछ सेकंड लगते हैं।
अब "Use Template" दबाएँ
डाउनलोड पूरा होते ही वही बटन Use Template में बदल जाता है। उसे दबाएँ, फिर VN आपसे वह मीडिया माँगेगा जो सैंपल क्लिप की जगह लेगा।
अपनी फ़ोटो या क्लिप चुनें
अब वे फ़ोटो या वीडियो क्लिप चुनें जो आप अपनी रील में रखना चाहते हैं। साफ़ और अच्छी क्वालिटी का मीडिया चुनने की कोशिश करें — पोर्ट्रेट फ़ोटो और वर्टिकल क्लिप सोशल मीडिया के लिए आम तौर पर सबसे अच्छी रहती हैं। कितनी क्लिप चाहिए यह हर टेम्पलेट में अलग होता है, इसलिए प्रोजेक्ट जितनी लेयर माँगे उतनी भर दें। हर लेयर अलग दिखे, इसके लिए पोज़ और फ़्रेमिंग बदलते रहें।
हर लेयर जाँचें
लेयर एक-दूसरे पर आती हैं, इसलिए फ़ोटो के किनारे की कोई ज़रूरी चीज़ दूसरी लेयर के पीछे छिप सकती है। एक-एक करके देखें और जो ढक रहा हो या ज़ूम में कट रहा हो उसे ठीक करें।
पूरा प्रीव्यू देखें
शुरू से आख़िर तक चलाएँ और फ़ोटो से ज़्यादा बीट टाइमिंग पर ध्यान दें। कोई कट गाने से थोड़ा हटकर लग रहा हो तो एक्सपोर्ट से पहले बस वही ठीक करने लायक़ है।
एक्सपोर्ट करके शेयर करें
VN में जो सबसे अच्छी क्वालिटी मिले उसी पर एक्सपोर्ट करें, रील फ़ोन में सेव हो जाएगी। वहाँ से सीधे Instagram Reels, Facebook, YouTube Shorts या WhatsApp स्टेटस पर डाल सकते हैं।
बेहतर रील बनाने के टिप्स
- भीड़ वाली फ़ोटो न लगाएँ। तीन लेयर के साथ ऐसी फ़ोटो फ़्रेम को गड़बड़ कर देती है।
- विषय को किनारों से दूर रखें — ओवरलैप होती लेयर सबसे पहले कोने ही ढकती हैं।
- एक क्लोज़-अप और एक चौड़ा शॉट मिलाएँ ताकि लेयर अलग-अलग लगें, दोहराव न लगे।
- एक जैसी लाइटिंग वाली फ़ोटो रखें ताकि सारी लेयर एक ही चीज़ का हिस्सा लगें।
- गाना ट्रेंड में रहते हुए ही पोस्ट करें — टाइमिंग उतनी ही अहम है जितनी एडिटिंग।
VN Code काम नहीं कर रहा?
स्कैनर कोड न पकड़े तो ज़्यादातर दिक़्क़त स्क्रीनशॉट में होती है — उसे इतना क्रॉप करें कि कोड पूरा फ़्रेम भरे, और सफ़ेद बॉर्डर भी साथ रहे। कम ब्राइटनेस या ज़्यादा दबी हुई इमेज भी स्कैन नहीं होती। प्रोजेक्ट इम्पोर्ट होकर खुल न रहा हो तो VN को लेटेस्ट वर्ज़न में अपडेट करें, क्योंकि पुराने वर्ज़न नए प्रोजेक्ट नहीं पढ़ पाते।
सावधानी: VN Video Editor सिर्फ़ ऑफिशियल Play Store से ही इंस्टॉल करें। अनजान वेबसाइट से VN का मॉड APK कभी डाउनलोड न करें।
ગુજરાતી — સંપૂર્ણ માહિતી
આમાં તમને શું મળે છે
VN Code ખરેખર આખો VN Video Editor પ્રોજેક્ટ છે, જે એક સ્કૅન થઈ શકે એવા કોડમાં સમાવી દેવાયો છે. સ્કૅન કરતાં જ 3 Layers એડિટ તમારા ફોનમાં એવું ને એવું બની જાય છે — દરેક લેયર, ટ્રાન્ઝિશન, ફિલ્ટર અને કટ પોતાની જગ્યાએ. અંદર દેખાતું મીડિયા માત્ર સૅમ્પલ છે; તમે તમારા ફોટા મૂકો છો અને સ્ટ્રક્ચર એવું જ રહે છે.
નામ પરથી જ રીત સ્પષ્ટ છે: એક સમયે એક ફોટો દેખાવાને બદલે ઘણા ફોટા અલગ અલગ લેયર પર રહે છે અને પોતપોતાની ગતિએ ચાલે છે. એનાથી જ એડિટમાં ઊંડાણ આવે છે, અને હાથે બનાવવામાં આ જ સૌથી કંટાળાજનક કામ છે.
આ એડિટ કેમ ચાલી નીકળ્યું
સામાન્ય સ્લાઇડશોમાં આંખને એક જ વસ્તુ જોવા મળે છે. ત્રણ લેયરમાં ત્રણ મળે છે, અને જ્યારે તે બીટ પર બદલાય ત્યારે રીલ ખરી ગતિ કરતાં પણ ઝડપી લાગે છે. એટલે આ સ્ટાઇલ સ્પષ્ટ અને ઝડપી બીટવાળા ગીતો પર સૌથી સારી ચાલે છે.
આ જ વસ્તુ હાથે બનાવવામાં દરેક લેયરનું અલગ કીફ્રેમિંગ અને દરેક મૂવમેન્ટ ગીત સાથે મેળવવું પડે છે. કોડ આ આખું કામ બચાવી દે છે — લોકપ્રિયતાનું કારણ એ જ છે.
VN Code વાપરવાની રીત
આ પોસ્ટ PromptPin પર ખોલો
Google ખોલીને PromptPin સર્ચ કરો, promptpin.in પર જાઓ અને આ 3 Layers VN Code પોસ્ટ ખોલો. આગલા ટ્રેન્ડિંગ કોડ માટે તેને બુકમાર્ક કરી લો.
VN Code સેવ કરો
ઉપર આપેલા કોડનો સ્ક્રીનશોટ લો, અથવા દબાવીને ગેલેરીમાં સેવ કરો. VN તેને તમારા ફોટામાંથી વાંચે છે, એટલે ઍપ ખોલતાં પહેલાં સેવ હોવું જરૂરી છે.
VN Video Editor ખોલો
VN ઍપ ખોલો. ઇન્સ્ટોલ ન હોય તો ઉપર આપેલા Open VN Video Editor બટનથી પહેલાં ઇન્સ્ટોલ કરી લો.
કોડ સ્કૅન કરો
VN માં સ્કૅનર ખોલો અને કાં તો કોડ બીજી સ્ક્રીન પર બતાવીને સ્કૅન કરો, અથવા સેવ કરેલો સ્ક્રીનશોટ ઇમ્પોર્ટ કરો. VN તેને વાંચીને ટેમ્પલેટ પેજ ખોલશે.
પહેલાં "Download" દબાવો
સૌથી પહેલાં Download બટન દેખાશે, Use Template નહીં. તેને દબાવો અને પ્રોજેક્ટ ડાઉનલોડ પૂરું થવાની રાહ જુઓ — ધીમા ઇન્ટરનેટ પર તેમાં થોડી સેકન્ડ લાગે છે.
હવે "Use Template" દબાવો
ડાઉનલોડ પૂરું થતાં જ એ જ બટન Use Template માં બદલાઈ જાય છે. તેને દબાવો, પછી VN તમારી પાસેથી એ મીડિયા માગશે જે સૅમ્પલ ક્લિપની જગ્યા લેશે.
તમારા ફોટા કે ક્લિપ પસંદ કરો
હવે તમારી રીલમાં જે ફોટા કે વિડિયો ક્લિપ રાખવા હોય તે પસંદ કરો. સ્પષ્ટ અને સારી ક્વોલિટીનું મીડિયા પસંદ કરવાનો પ્રયાસ કરો — પોર્ટ્રેટ ફોટા અને વર્ટિકલ ક્લિપ સોશિયલ મીડિયા માટે સામાન્ય રીતે સૌથી સારાં રહે છે. કેટલી ક્લિપ જોઈએ તે દરેક ટેમ્પલેટમાં અલગ હોય છે, એટલે પ્રોજેક્ટ જેટલી લેયર માગે એટલી ભરી દો. દરેક લેયર અલગ દેખાય એ માટે પોઝ અને ફ્રેમિંગ બદલતા રહો.
દરેક લેયર તપાસો
લેયર એકબીજા પર આવે છે, એટલે ફોટાની કિનારીની કોઈ જરૂરી વિગત બીજી લેયર પાછળ છુપાઈ શકે. એક એક કરીને જુઓ અને જે ઢંકાતું હોય કે ઝૂમમાં કપાતું હોય તે ગોઠવો.
આખું પ્રીવ્યૂ જુઓ
શરૂથી અંત સુધી ચલાવો અને ફોટા કરતાં બીટ ટાઇમિંગ પર ધ્યાન આપો. કોઈ કટ ગીતથી સહેજ આઘોપાછો લાગે તો એક્સપોર્ટ પહેલાં ફક્ત એ જ સુધારવા જેવું છે.
એક્સપોર્ટ કરીને શેર કરો
VN માં જે સૌથી સારી ક્વોલિટી મળે તેના પર એક્સપોર્ટ કરો, રીલ ફોનમાં સેવ થશે. ત્યાંથી સીધું Instagram Reels, Facebook, YouTube Shorts કે WhatsApp સ્ટેટસ પર મૂકી શકાશે.
સારી રીલ બનાવવાની ટિપ્સ
- ભીડવાળા ફોટા ન વાપરો. ત્રણ લેયર સાથે એવા ફોટા ફ્રેમને ગૂંચવી નાખે છે.
- વિષયને કિનારીઓથી દૂર રાખો — ઓવરલેપ થતી લેયર સૌથી પહેલાં ખૂણા જ ઢાંકે છે.
- એક ક્લોઝ-અપ અને એક પહોળો શોટ ભેળવો જેથી લેયર અલગ લાગે, પુનરાવર્તન ન લાગે.
- સરખી લાઇટિંગવાળા ફોટા રાખો જેથી બધી લેયર એક જ વસ્તુનો ભાગ લાગે.
- ગીત ટ્રેન્ડમાં હોય ત્યારે જ પોસ્ટ કરો — ટાઇમિંગ એડિટિંગ જેટલું જ મહત્ત્વનું છે.
VN Code કામ નથી કરતો?
સ્કૅનર કોડ ન પકડે તો મોટાભાગે તકલીફ સ્ક્રીનશોટમાં હોય છે — તેને એટલો ક્રોપ કરો કે કોડ આખી ફ્રેમ ભરે, અને સફેદ બોર્ડર પણ સાથે રહે. ઓછી બ્રાઇટનેસ કે વધુ દબાયેલી ઇમેજ પણ સ્કૅન થતી નથી. પ્રોજેક્ટ ઇમ્પોર્ટ થઈને ખૂલતો ન હોય તો VN ને લેટેસ્ટ વર્ઝનમાં અપડેટ કરો, કારણ કે જૂનાં વર્ઝન નવા પ્રોજેક્ટ વાંચી શકતાં નથી.
સાવચેતી: VN Video Editor ફક્ત ઑફિશિયલ Play Store પરથી જ ઇન્સ્ટોલ કરો. અજાણી વેબસાઇટ પરથી VN નું મોડ APK ક્યારેય ડાઉનલોડ ન કરો.
Need photos for this template?
Good source photos make the difference here. If you are short of shots that suit this edit, use these AI photo prompts to create some:
